# Restoring Corrupted BIOS Some people successfully bricked their PC when updating the BIOS and apart from manually flashing the ROM chip itself there doesn't seem to be any options. The following guide describes how to restore the BIOS ROM on the [[AXB35 board|Hardware/Boards/Sixunited_AXB35]] ([[GMKtec EVO-X2 PC|Hardware/PCs/GMKtec_EVO-X2]]), also mentioning basic details for the EC one. > [!NOTE] > The original information was provided by `tecchan1225` here: > https://x.com/tecchan1225/status/1991781880598052927 > (translated, adapted to a guide format and added to the wiki with their permission) > [!CAUTION] > The procedure involves direct hardware manipulation and may void your warranty. Proceed at your own risk. ### ROM Specifications | **Model** | **Winbond W25R256JWEQ** (BIOS ROM) | **FUDAN FM25F01C** (EC ROM) | | ----------------------- | ---------------------------------- | --------------------------- | | Memory Density | 256 Mbits | 1 Mbit | | Interface | SPI / Dual SPI / Quad SPI | SPI | | Operating Voltage | 1.7 to 1.95V | 2.3 to 3.6V | | Maximum Clock | 104 MHz | 100 MHz | | Package | WSON8 (8x6 mm) | SOP-8 (3.9x4.9 mm) | | Architecture | 4KB Uniform Sector | - | | Photo | [](./axb35-bios-rom-chip.jpg) | [](./axb35-ec-rom-chip.jpg) | ### Prerequisites Both ROM chips are located on the back side of the motherboard, so the PC needs to be disassembled first. Refer to this video for disassembly and **don't forget to remove the CMOS battery just in case**: https://youtu.be/1zUyVSKtczU [](./axb35-roms-location.jpg) Items required for BIOS ROM (W25R256JWEQ) programming: - CH341A programmer - 1.8V adapter, as the ROM operates at 1.8V - WSON8-compatible probe (the one included with the CH341A is not suitable) - programming PC (Windows was used this time) - programming software (AsProgrammer v3.17) - valid BIOS ROM (grab it from [[Firmware|Hardware/Boards/Sixunited_AXB35/Firmware]] page) - (optional) a spare W25R256JWEQ chip to test your setup [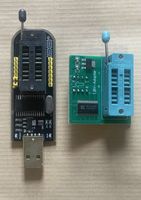](./prereqs1.jpg) [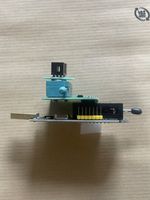](./prereqs2.jpg) [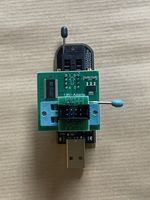](./prereqs3.jpg) [](./prereqs4.jpg) All components can be purchased from Amazon or AliExpress. Be cautious when ordering the WSON8 probe - ensure it's the 8x6 mm variant, as 5x6 mm variants exist and are not compatible. ### BIOS ROM Flashing Process > [!WARNING] > Follow static electricity precautions throughout this procedure, especially during seasonal conditions with low humidity. #### Step 1: Test ROM Programming (Recommended) 1. Connect the test ROM chip to the CH341A. You may need to hold the chip down with a clip if the included cover won't close normally. 2. Launch AsProgrammer and detect the ROM chip. 3. **Unlock the ROM** if a protection bit is set (AsProgrammer should prompt you). 4. Write, then read and verify the ROM to ensure your setup works correctly. 5. Once you're sure that everything works fine, proceed to the next step. [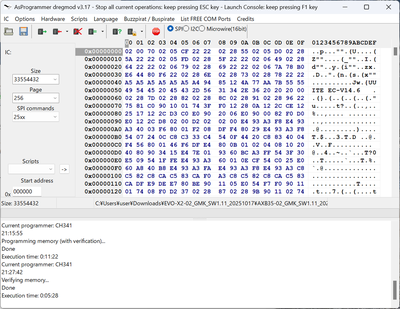](./programmer.png) #### Step 2: Program the ROM 1. Connect the WSON8 probe to the W25R256JWEQ chip on the motherboard. 2. Launch AsProgrammer and detect the ROM chip. 3. **Unlock the ROM** if a protection bit is set (AsProgrammer should prompt you). 4. Load your BIOS image file and initiate the write operation. 5. **Keep the probe steady for the entire duration** - this could take several minutes and poor contact will lead to write errors. 6. After writing completes, verify that the ROM contents match your image file. [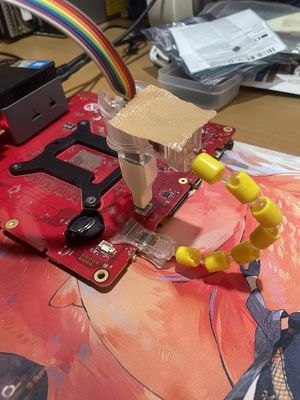](./flashing.jpg) #### Step 3: Lock the ROM You have two options to re-lock the ROM: - use AsProgrammer to lock the ROM before reassembly - reassemble the PC, boot into Windows, and re-flash the BIOS using the manufacturer's official BIOS update tool; this will re-lock the ROM through normal firmware procedures ### Alternative Method: Desoldering Alternatively, If you have soldering experience and equipment, you can desolder the ROM chip and flash it externally without needing a probe. Of course there are risks of damaging the motherboard, so only attempt if you know what you're doing. ### Relevant Pages - [[Hardware/Boards/Sixunited_AXB35]] - [[Hardware/PCs/GMKtec_EVO-X2]]